Oil Painting First Layer Calculator
Determine the optimal preparation method and workflow for your next oil painting based on style, timeline, and subject matter.
Recommended Preparation Strategy
There is a specific moment in every oil painting where the magic either starts or stalls. It happens before you mix your vibrant cadmium red or your deep ultramarine blue. It happens when you stare at that blank, white canvas and realize that putting wet paint directly onto dry, absorbent fabric is a recipe for disaster. You might be wondering what exactly goes down first. Is it a sketch? A wash of color? Or do you just start painting?
The answer isn't as simple as picking a brush and diving in. The first layer of an oil painting serves two distinct but connected purposes: it prepares the surface physically so the paint adheres properly, and it establishes the visual foundation so your colors sing rather than muddy up. If you skip this step, your painting might crack in five years, or worse, look flat and lifeless from day one.
The Physical Foundation: The Ground
Before we talk about art, we have to talk about chemistry. The very first "layer" is technically not paint at all-it’s the ground, which is a preparatory coating applied to the support (canvas, wood panel) to create a suitable surface for painting. Most artists buy pre-primed canvases, which usually come with an acrylic gesso base. This is fine for quick studies, but if you are serious about traditional oil techniques, you need to understand what is underneath your brushes.
Traditional oil grounds are made from linseed oil mixed with chalk or gypsum. They remain slightly flexible and porous, allowing subsequent layers of oil paint to bond chemically through a process called oxidation. Acrylic gesso, on the other hand, is plastic-based. It seals the canvas completely. While modern oil paints can sit on top of acrylic gesso without immediate failure, they don't interact with the surface in the same way. For a painting meant to last centuries, an oil-based ground allows the paint to sink in slightly, creating a mechanical and chemical lock that prevents flaking.
If you are buying a cheap, pre-stretched canvas from a big-box store, it likely has a thin, brittle layer of acrylic primer. You can paint on it, but you are already fighting the material. For best results, many professional painters apply their own ground. A common recipe involves mixing zinc white pigment with linseed oil and a touch of damar varnish to create a smooth, non-absorbent, yet toothy surface. This ensures that when you finally apply your actual paint, it sits on top and retains its luminosity rather than being sucked into the fibers of the linen.
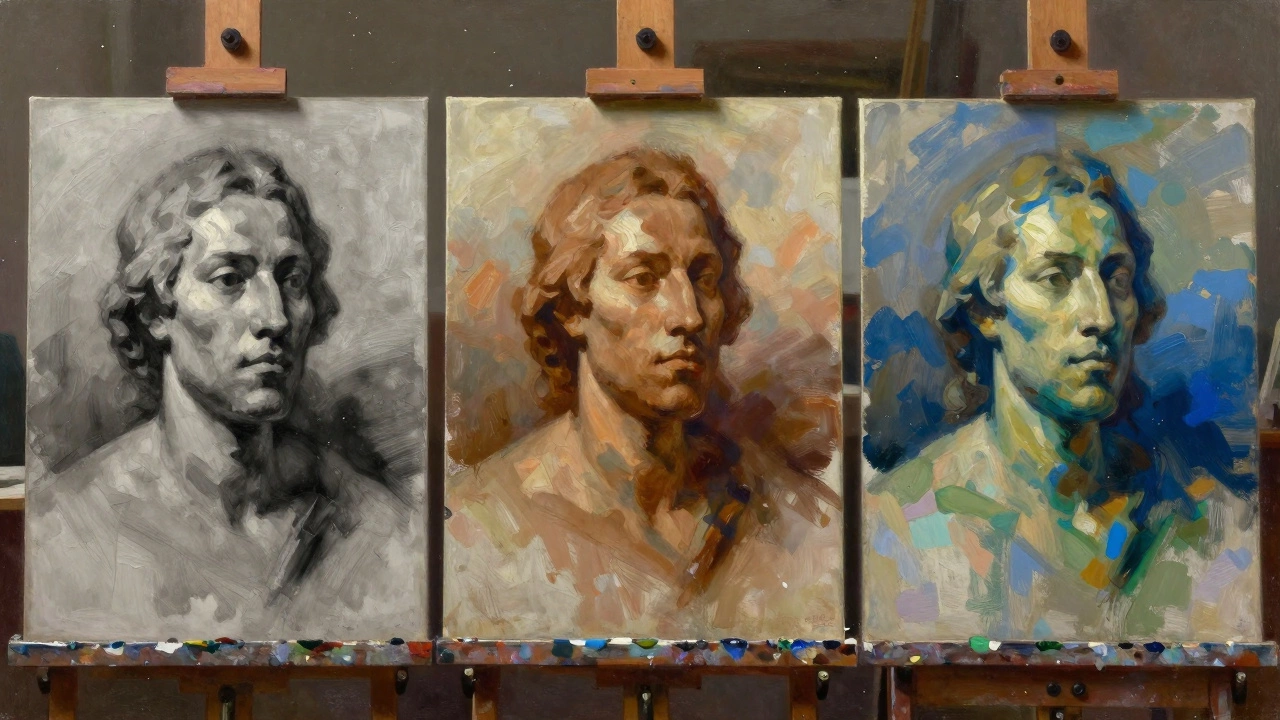
The Visual Foundation: Choosing Your Underpainting Method
Once the physical ground is dry, you face the artistic decision: how do you map out the image? This is where the term underpainting comes into play. It is the initial layer of paint applied to establish values, composition, and sometimes color, serving as a guide for subsequent layers. There are three dominant approaches here, each offering different advantages depending on your style and subject matter.
The most traditional method is Grisaille. This involves painting the entire composition in monochrome-usually shades of gray, though some artists use raw umber or burnt sienna. The goal is to nail down the light and shadow relationships (values) without the distraction of hue. Once this layer is dry, you apply transparent or semi-transparent glazes of color over it. Because the darks are already established in the gray layer, the final painting has incredible depth. Think of Rembrandt’s portraits; the drama comes from that underlying structure of light and dark, not just the skin tones.
Another popular technique is Venice Burn (or Venetian Glazing). Instead of starting with grays, you start with warm earth tones like ochre, yellow ochre, or burnt sienna. You block in the forms loosely, then let it dry. Then, you glaze cool colors over the warm underpainting. The optical mixture of warm underlayers and cool top layers creates a vibrancy that mixing paint on a palette simply cannot achieve. Titian used this method to make flesh tones look alive and breathing.
For those who prefer working faster and more intuitively, there is Alla Prima (wet-on-wet). In this case, there isn't really a separate "first layer" in the traditional sense. You apply the paint directly to the toned canvas and work the whole painting in one session. However, even Alla Prima painters rarely start on stark white. They tone the canvas first.
Why You Should Never Start on White
You might be tempted to leave your canvas pure white. Don’t. White is the brightest value in your range. If you start on white, you have no middle ground to judge your shadows against. Everything will look too light until you’ve painted everything else. Furthermore, white absorbs color. If you put a thin glaze of blue over white, it looks pastel. If you put that same glaze over a mid-tone brown, it looks rich and deep.
Toning your canvas means applying a thin wash of color to the entire surface before you begin. Common choices include:
- Yellow Ochre: Perfect for landscapes and portraits. It mimics natural sunlight and helps unify skin tones.
- Burnt Sienna: Great for dramatic lighting and warmer subjects. It provides a strong contrast for both lights and darks.
- Raw Umber: Ideal for moody scenes or night paintings. It pushes the overall key of the painting darker immediately.
To tone a canvas, mix a small amount of your chosen color with turpentine or odorless mineral spirits (OMS) until it’s translucent. Brush it on thinly and evenly. Let it dry. Now, when you paint your highlights, they will pop against the mid-tone. When you paint your shadows, they will recede naturally. You’ve essentially set the stage for your values.
| Technique | Best For | Drying Time | Complexity |
|---|---|---|---|
| Grisaille | Realism, Portraits, Dramatic Light | Days to Weeks (must be dry) | High (requires strong drawing skills) |
| Venice Burn | Flesh Tones, Luminous Effects | Days to Weeks (must be dry) | Medium (focus on color temperature) |
| Dead Color | Landscapes, Quick Studies | Hours to Days | Low (loose blocking in) |
| Alla Prima | Impressionism, Plein Air | N/A (single session) | Medium (requires confidence) |
The Role of Fat Over Lean
No discussion about the first layer of oil painting is complete without mentioning the golden rule: Fat over Lean. This principle dictates that each successive layer of paint must contain more oil (fat) than the layer beneath it. Why? Because oil paint dries by oxidation, forming a skin. If a leaner (less oily) layer is placed on top of a fatter (more oily) layer, the bottom layer continues to expand and contract as it cures, while the top layer becomes rigid. This stress causes cracking.
Your first layer should be the "leanest." This means using a high ratio of solvent (turpentine/OMS) to paint, and avoiding medium-heavy oils like linseed oil entirely. Use only the pigment and solvent. As you move to subsequent layers, you gradually introduce more oil-either through the paint itself (which contains some oil) or by adding a medium like linseed oil or walnut oil. By the time you reach your final highlights, those layers should be the fattiest, ensuring they remain flexible and durable.

Common Mistakes to Avoid
Even experienced painters stumble at the start. Here are the most frequent errors regarding the first layer:
- Painting on Wet Ground: If you applied your own oil ground or a thick layer of gesso, ensure it is bone dry. Painting over damp primer traps moisture, leading to mold or poor adhesion.
- Using Too Much Medium Early On: Beginners often add linseed oil to their first layer to make it blend easier. Resist this. Use solvent for the first layer. Save the oil for later stages.
- Ignoring the Sketch: Before any paint touches the canvas, you need a drawing. Use charcoal or a thinned wash of burnt umber to sketch your composition. If the drawing is wrong, the painting will be wrong, no matter how beautiful the colors are.
- Mixing Paints That Aren't Compatible: Avoid using alkyd mediums in the first layer if you plan to use traditional slow-drying oils later. Alkyds cure quickly and become hard. Putting soft, slow-drying oil on top of hard alkyd can cause issues. Stick to solvents for the first pass.
Practical Steps for Your Next Painting
So, what should you actually do when you sit down to paint? Here is a streamlined workflow:
- Prepare the Surface: Ensure your canvas is primed and free of dust. If using a new canvas, lightly sand it if it feels too rough.
- Tone the Canvas: Mix Yellow Ochre with OMS. Apply a thin, even wash over the entire surface. Let it dry completely (usually overnight).
- Sketch the Composition: Use a piece of charcoal or a rigger brush with thinned burnt umber to draw your main shapes. Focus on proportions and placement, not details.
- Block in Values (Optional but Recommended): Using a limited palette (e.g., Titanium White, Burnt Umber, and Ultramarine Blue), paint the major light and shadow areas. Keep it loose. Do not worry about color yet. Just get the values right. Let this layer dry.
- Begin Color Application: Now you can start applying your full color palette. Remember to keep the first color layer relatively lean (solvent-based) and build up thickness and oil content as you progress.
By taking the time to establish a proper ground and underpainting, you aren't slowing down your process-you're speeding up your success. You’ll spend less time fixing mistakes and more time enjoying the act of creation. The first layer is the anchor. Make it strong, and the rest of the painting will hold together.
Can I paint oil directly on unprimed canvas?
You technically can, but it is highly discouraged. Unprimed canvas is acidic and absorbent. The oil from the paint will soak into the fibers, causing the canvas to rot over time and the paint to become dull and brittle. Always use a ground, whether it's acrylic gesso or traditional oil ground, to protect the support and provide a stable painting surface.
How long should I wait between the first layer and the second layer?
It depends on the thickness of the paint and the pigments used. Thin layers of lean paint (mixed with solvent) may dry to the touch in a few days. Thick impasto layers can take weeks or even months to cure fully. A good rule of thumb is to wait at least one week before applying significant pressure or heavy layers on top. If you are in a hurry, you can use fast-drying alkyd mediums, but remember the fat-over-lean rule still applies.
What is the difference between a ground and an underpainting?
The ground is the preparatory coating that makes the surface paintable (like gesso or oil ground). It is structural. The underpainting is the first layer of actual pigment applied to establish the image’s values and composition. It is artistic. You apply the ground first, let it dry, and then apply the underpainting.
Is Grisaille better than Venice Burn?
Neither is objectively better; they serve different aesthetic goals. Grisaille is excellent for establishing precise values and creating dramatic, sculptural forms, making it ideal for realism and portraiture. Venice Burn creates luminous, glowing effects by layering cool colors over warm earth tones, making it perfect for flesh tones and romantic landscapes. Choose based on the mood you want to achieve.
Can I use acrylics for the underpainting?
Yes, many contemporary artists use acrylics for underpainting because they dry quickly and are water-soluble. This allows you to set up your composition and values rapidly. However, you must ensure the acrylic layer is completely dry and sealed before applying oils. Some purists avoid this due to differences in flexibility and aging characteristics, but it is a widely accepted practice in modern studios.